
🔹 Key Takeaways
- IPMAT Indore 2026 registration happens entirely online — no offline forms, no DD, no courier.
- Application fee is around ₹4,130 for General/OBC candidates and ₹2,065 for SC/ST/PwD candidates.
- Keep these ready before opening the form: scanned photo (JPEG, 10–200 KB), scanned signature (JPEG, 10–50 KB), Class 10 marksheet, and a valid ID proof.
- One careless error — wrong category, name that doesn’t match your Class 10 marksheet, or an oversized photo — can get your application rejected. And the fee won’t come back.
Table of Contents
- What Is the IPMAT Indore Application Form 2026?
- IPMAT Indore 2026: Key Registration Dates
- Who Is Eligible to Apply?
- Documents Required Before You Begin
- Step-by-Step: How to Fill the IPMAT Indore Form 2026
- Photo & Signature Specifications
- Application Fee: What’s Included
- 7 Mistakes That Get Applications Rejected
- What Happens After You Submit?
- Frequently Asked Questions
- Conclusion
What Is the IPMAT Indore Application Form 2026?
Here’s something that surprises a lot of students every year: you can prepare for months, be genuinely ready for the exam — and still not get to sit it because the registration form had an error. IIM Indore is strict about this. A name that doesn’t match your marksheet, a photo that’s 210 KB instead of 200 KB, a school email that stopped working after Class 12 — these things have real consequences.
The IPMAT Indore application form is your entry pass to the five-year Integrated Programme in Management at IIM Indore. Everything happens online — registration, document upload, fee payment, all of it. There’s no offline version, no demand draft, nothing to print and post.
Once the window closes, it’s closed. There’s no extension, no second chance to apply that year. That’s what makes this guide worth reading carefully before you open the form.
Not sure if you’re eligible before applying? Read: IPMAT Indore 2026 Eligibility Criteria — Complete Guide
IPMAT Indore 2026: Key Registration Dates
Here’s a detailed overview of the expected timeline for IPMAT registration 2026.
| Event | Indicative Date (2026) |
|---|---|
| Official Notification Release | Released October 8, 2025 |
| Registration Window Opens | 2nd February, 2026 |
| Last Date to Apply | 14th March, 2026 |
| Last Date for Fee Payment | March 2026 |
| Admit Card Release | First week of May 2026 |
| IPMAT 2026 Exam Date | 04-May-2026 |
| Result Declaration | June 2026 |
Bookmark iimindore.ac.in now if you haven’t already. The registration window usually stays open for 4–6 weeks, but don’t let that make you complacent. Servers get overloaded in the last two days, payments fail, and IIM Indore doesn’t offer extensions for technical reasons.
Want to build a prep plan around this calendar? Read: IPMAT 2026 Exam Pattern & Syllabus
Who Is Eligible to Apply?
Take two minutes to check this before you open the form. Filling the entire application and paying ₹4,000+ only to be disqualified later is a painful — and avoidable — experience.
| Criterion | Requirement |
|---|---|
| Age | Born on or after August 01, 2006 (SC/ST/PwD: August 01, 2001) |
| Class 12 Marks — General / NC-OBC | A passed XII Class or equivalent |
| Class 12 Marks — SC / ST / PwD | A passed XII Class or equivalent |
| Appearing Candidates | Class 12 students appearing in 2026 boards are eligible |
| Minimum Percentage | Not Required |
| Nationality | Indian nationals and OCI cardholders |
Documents Required Before You Begin
Open everything listed below before you start the form — not halfway through. The portal times out after a period of inactivity, and if that happens mid-fill, you’ll have to start over. Nobody wants that.
| Document | Format | Size Limit |
|---|---|---|
| Scanned passport-size photograph | JPEG / JPG | 10 KB – 200 KB |
| Scanned signature (white paper, black ink) | JPEG / JPG | 10 KB – 50 KB |
| Class 10 mark sheet | Reference only (not uploaded at this stage) | — |
| Class 12 mark sheet / admit card (if appearing) | Reference only | — |
| Valid government ID (Aadhaar / Passport / Voter ID) | Reference only | — |
| Category certificate (SC / ST / OBC / PwD) | Keep ready — needed at the PI stage | — |
Photo tip: The easiest approach — go to a passport studio, get a 3.5 cm × 4.5 cm photo clicked, and ask them for the digital JPEG file. They’ll have it. That’s almost always within the size and format requirements, and it saves the trouble of scanning and compressing at home.
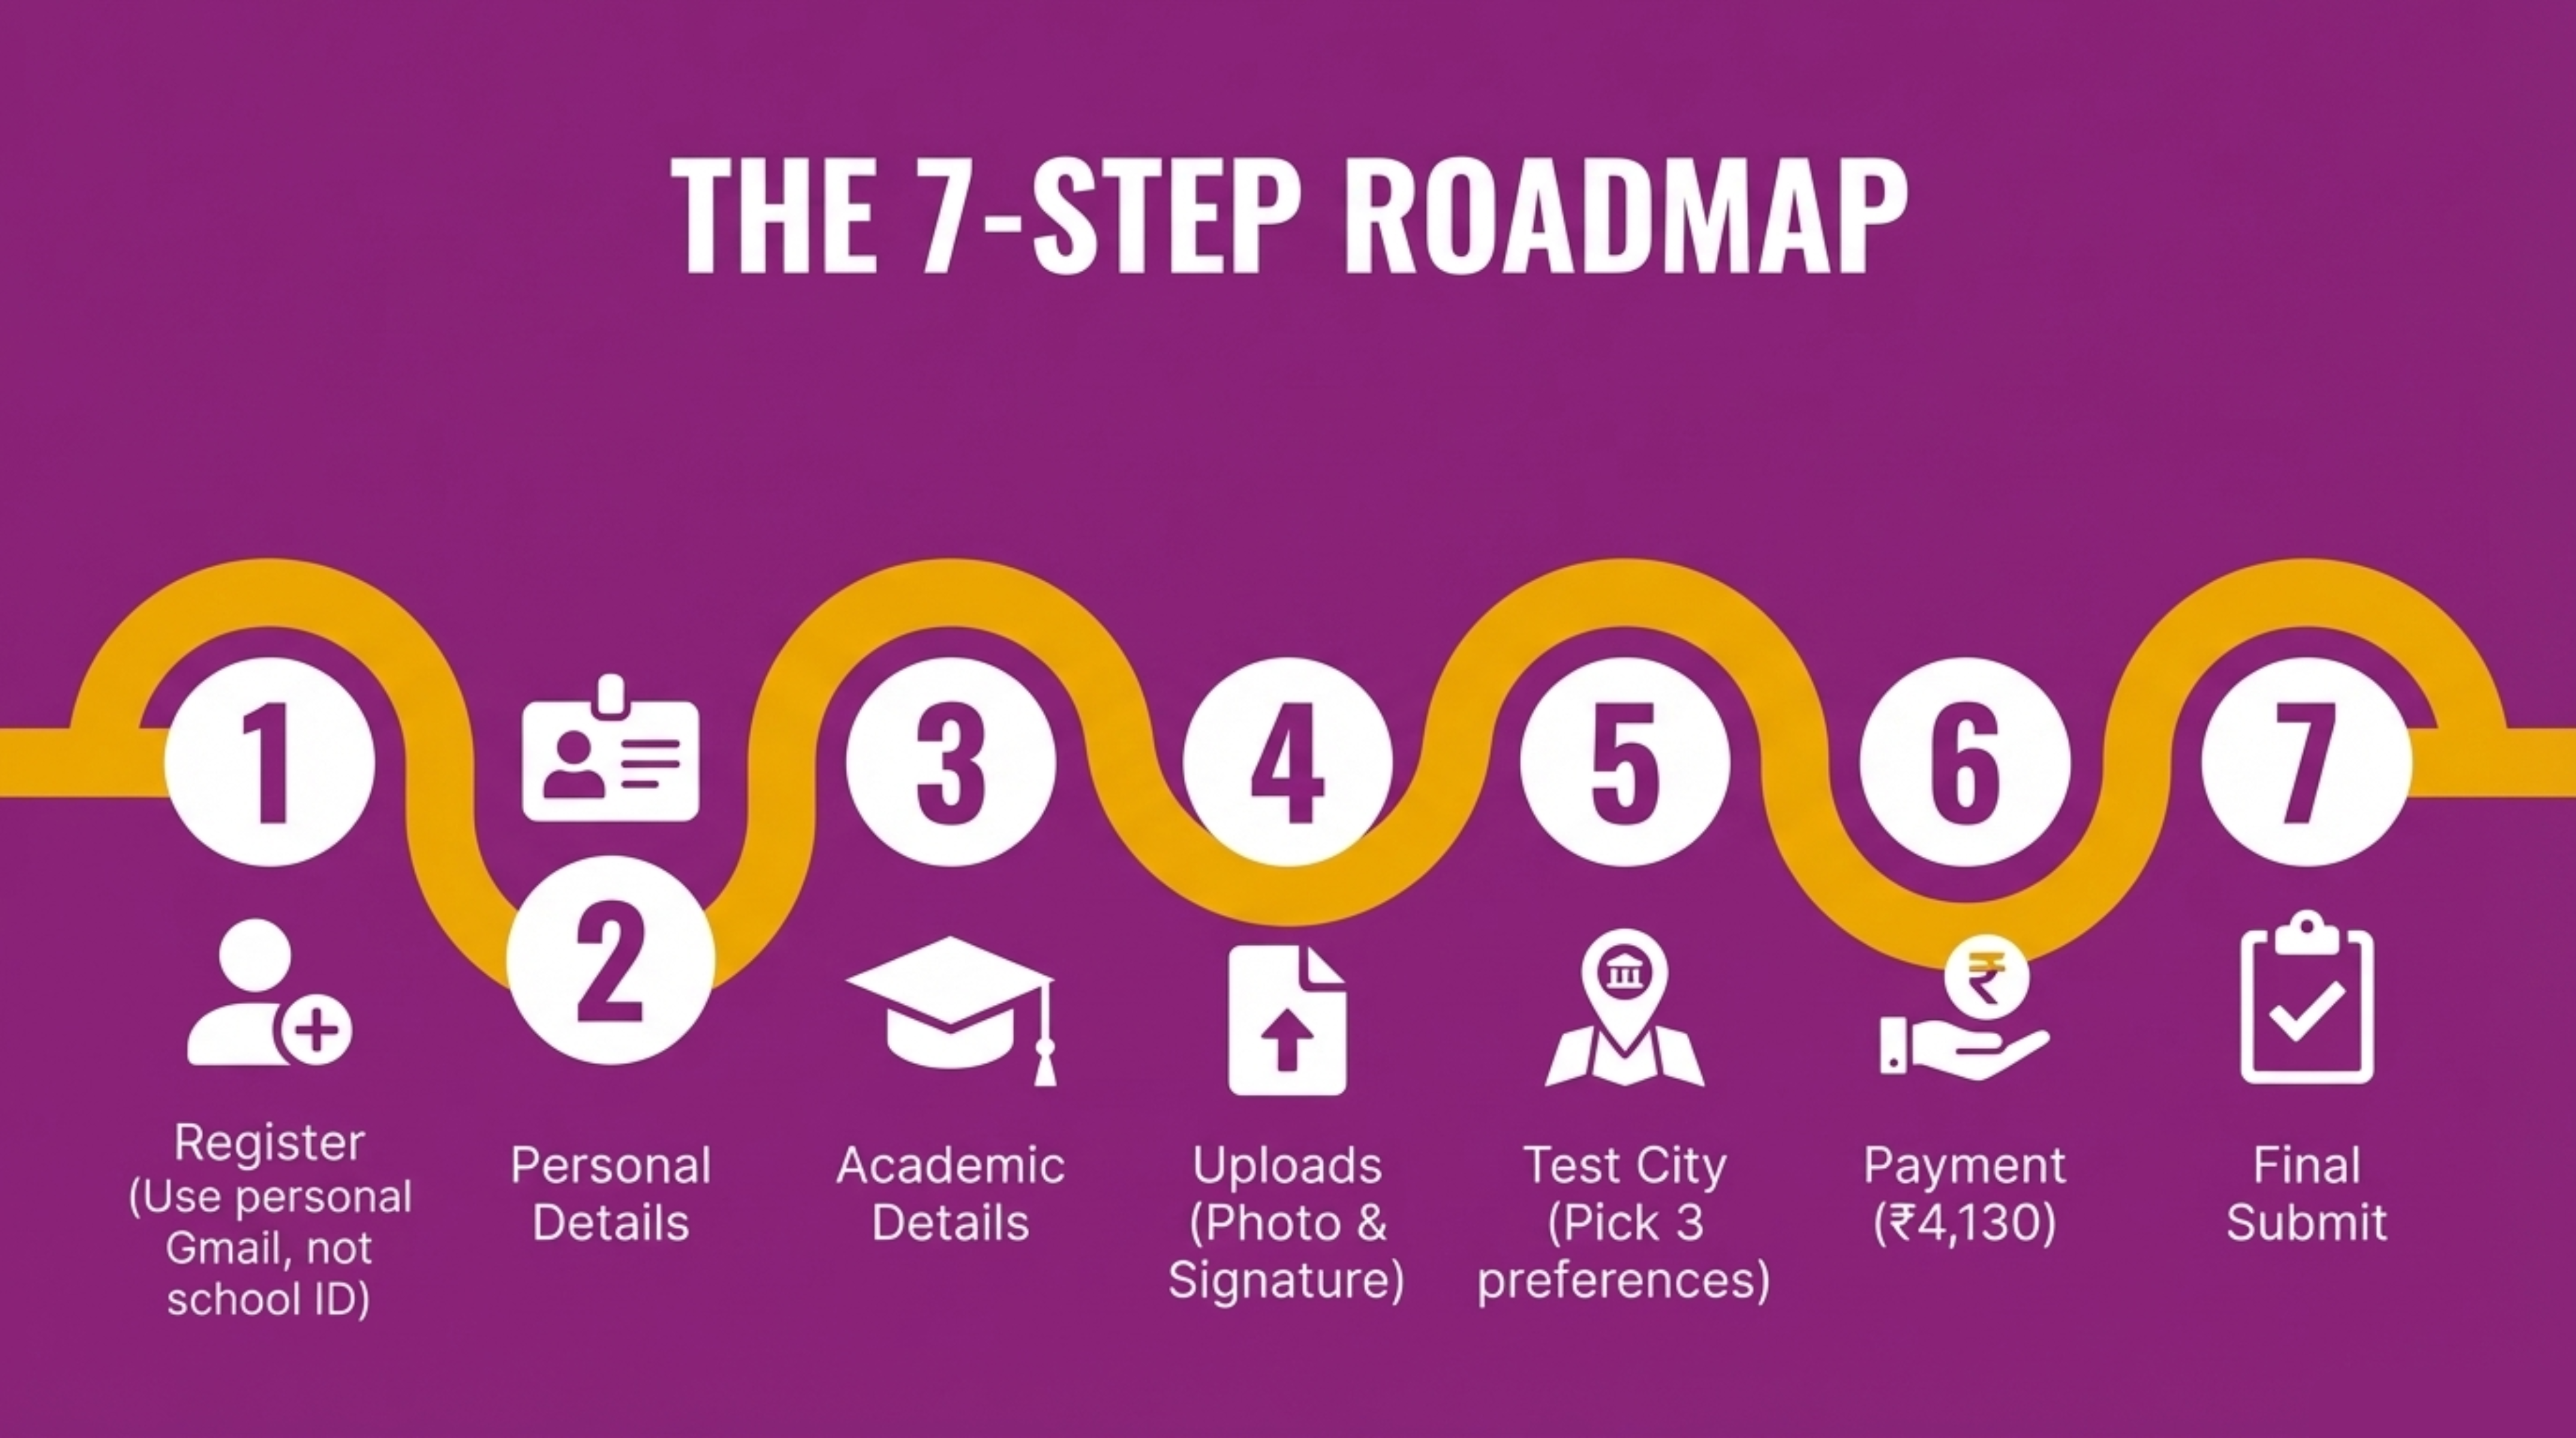
Step-by-Step: How to Fill the IPMAT Indore Application Form 2026
Step 1: Visit the Official Portal & Register
Go to the official IIM Indore admissions portal. — [https://iimidr.ac.in/ > Admissions > IPM] Don’t Google “IPMAT Indore registration” and click the first result — there are coaching sites and aggregators that look similar to the official page. Go directly to iimindore.ac.in.
On the registration page, here’s what you’ll need to do:
- Enter a personal email address — your Gmail, not your school email. School IDs get deactivated after Class 12, and that’s exactly when IIM Indore sends your admit card and result.
- Enter your active mobile number — an OTP comes to this number, so it has to be one you can access right now.
- Create a strong password — at least 8 characters, mix of letters, numbers, and a symbol or two.
- Verify both the OTP on email and mobile.
- Write down or screenshot the login credentials somewhere safe. You’ll need them again for the admit card, results, and any future correspondence.
⚠️ Don’t register twice. Some students, confused by a slow portal or a failed OTP, register again with a different email. IIM Indore flags duplicate entries, and both registrations can get disqualified. If you’re locked out, use “Forgot Password” — not a fresh registration.
Step 2: Fill Personal Details
This section looks simple, and it mostly is — but it’s also where one of the most common rejections happens. The name you enter here must be word-for-word identical to what’s on your Class 10 marksheet. Not a nickname, not an initial instead of a middle name — exactly as it appears.
| Field | What to Enter |
|---|---|
| Full Name | Exactly as it appears on the Class 10 mark sheet — no initials, no abbreviations |
| Date of Birth | As per Class 10 mark sheet (DD/MM/YYYY) — open the marksheet and copy it, don’t type from memory |
| Gender | Male / Female / Transgender |
| Category | General / OBC-NC / SC / ST / PwD — read the options carefully before selecting |
| Sub-category (if applicable) | EWS, Kashmiri Migrant, etc. |
| Nationality | Indian / OCI |
| State of Domicile | As per current residence |
| Parent/Guardian Name | Father’s or Mother’s full name |
| Contact Details | Add a parent’s number as alternate contact — they’re usually the ones checking when students are in exam mode |
| Correspondence Address | Full postal address with PIN code |
The name thing is serious: If the form says “Rahul K. Sharma” but the marksheet says “Rahul Kumar Sharma,” and the Aadhaar says “Rahul Sharma” — that’s three mismatches. Exam centre invigilators check this, and they can turn you away. Keep your Class 10 marksheet open on the side while filling this section.
Step 3: Fill Academic Details
This section is straightforward as long as you’re looking at the right documents while filling it. The one thing that trips students up — CGPA. If your school gives grades in CGPA, you need to convert it to percentage before entering it here. Don’t enter 9.2 in a field that asks for percentage.
| Field | What to Enter |
|---|---|
| Class 10 Board | CBSE / ICSE / State Board / Other |
| Class 10 Year of Passing | The year you appeared (e.g., 2024) |
| Class 10 Percentage | Aggregate percentage — not CGPA. Convert first if needed. |
| Class 12 Status | Passed / Appearing in 2026 |
| Class 12 Board | Your board name |
| Class 12 Stream | Science / Commerce / Humanities |
| Class 12 Percentage | Enter aggregate if results are out; select “Appearing” if boards are still pending |
| School Name & City | Current school (mainly relevant for appearing candidates) |
CGPA to percentage: For CBSE students, the standard conversion is CGPA × 9.5. So a 9.2 CGPA becomes 87.4%. Use your board’s official formula if it’s different. And don’t round up — enter the actual converted number.
Step 4: Upload Photo & Signature
Honestly? This is the step where most applications run into problems. Not because it’s complicated, but because students rush through it. The portal accepts the upload, shows a green tick, and then the scrutiny team rejects it two weeks later because the background wasn’t white enough or the file was a PNG.
Here’s how to do it right:
- Click “Upload Photo” and select your JPEG file.
- If a crop tool appears, use it — adjust so your face takes up most of the frame, with no stray borders or background clutter.
- Click “Upload Signature” and select that JPEG.
- Before moving on, preview both. If anything looks off — blurry, grainy, weirdly cropped — go back and re-upload. Don’t assume it’s fine.
A green tick doesn’t mean the photo passed scrutiny. The portal checks file size and format, not photo quality or background colour. The actual review happens later. By then, corrections are near-impossible. Get it right the first time.
Step 5: Select Test City Preferences
IPMAT Indore is held across multiple cities in India.
- Choose 3 test city preferences, ranked in order.
- IIM Indore allots cities based on seat availability — getting your first preference isn’t guaranteed.
- Once submitted, this cannot be changed. Think about it before selecting.
Step 6: Pay the Application Fee
Once all the sections are filled, it’s time to pay. This is also the point of no return — the fee doesn’t come back regardless of what happens next.
Fee structure [amounts may change for 2026]:
| Category | Application Fee (Approx.) |
|---|---|
| General | ₹4,130 |
| NC-OBC | ₹4,130 |
| SC / ST | ₹2,065 |
| PwD | ₹2,065 |
Payment modes accepted:
- Credit card (Visa / Mastercard / RuPay)
- Debit card
- Net banking
- UPI (GPay, PhonePe, Paytm)
A few things worth keeping in mind while paying:
- Make sure the card or account has enough balance before you start — a mid-payment failure can lock the form temporarily.
- If you’re using UPI, do it on a stable connection. UPI timeouts during payment are one of the most common panic-inducing issues near the deadline.
- Screenshot the payment confirmation page. Note the transaction reference number somewhere. You’ll want it if anything goes wrong.
- The fee is non-refundable. That’s IIM Indore’s policy, no exceptions.
Step 7: Final Submission & Confirmation
Almost done — but treat this step like it matters, because it does. There’s no edit option once you hit Submit.
- Use the “Preview” option to go through every section one more time. Don’t skip this.
- Cross-check: name spelling, date of birth (day and month, not just year), category, photo quality, and mobile number.
- Click “Final Submit” only when everything looks right.
- Download the application confirmation PDF the moment it appears. Save it to your phone and your laptop — somewhere you won’t lose it.
- Write down the Application Number. This is what you’ll use to download your admit card, check your result, and contact the helpdesk if needed.
Photo & Signature Specifications
Here’s the full spec breakdown. Read through this before uploading — especially the “Not Accepted” row, which covers the most common mistakes.
| Specification | Photo | Signature |
|---|---|---|
| File Format | JPEG / JPG only | JPEG / JPG only |
| File Size | 10 KB – 200 KB | 10 KB – 50 KB |
| Dimensions | 3.5 cm × 4.5 cm (passport size) | Signed on white paper with black or blue pen |
| Background | Plain white — not off-white, not cream | White paper |
| Face | 70–80% of frame, facing forward, eyes open, no glasses | — |
| Recency | Taken within the last 6 months | — |
| Not Accepted | Selfies, sunglasses, caps, filters, PNG or HEIC files | Digital signatures, typed signatures |
Photos that get flagged most often:
- Background is slightly off-white or cream — common with photos taken at home
- Phone photos with a visible camera frame around the edges
- Face turned slightly sideways or partially shadowed
- File saved as PNG or HEIC (iPhone default formats) instead of JPG
Application Fee: What’s Included
The application fee covers one thing: the right to appear in IPMAT 2026. That’s it — access to the exam, one attempt, and your score going to IIM Indore’s admission committee. There’s no additional fee for downloading the admit card, checking results, or receiving a PI call letter.
Worth mentioning: some third-party websites charge money for “helping you register” for IPMAT. That’s a scam. The official form is free to access — you only pay the application fee, and it goes directly to IIM Indore through the official portal. Don’t pay anyone else.
Form’s open — is your prep keeping pace?
Take IPM Careers’ free IPMAT Mock Test Series. Most students get a clear picture of where they stand within the first week.
7 Mistakes That Get IPMAT Indore Applications Rejected
Every year, students who’ve put in serious preparation get knocked out — not by the exam, but by form errors. These aren’t rare edge cases. These are patterns we’ve seen repeat across hundreds of applications. All of them are avoidable.
- Name mismatch: The form says “Rahul K. Sharma.” The marksheet says “Rahul Kumar Sharma.” The Aadhaar says “Rahul Sharma.” That’s three versions of the same name — and it causes a verification failure at the exam centre. Your name on the form must match your Class 10 certificate character by character.
- Selecting OBC instead of OBC-NC: OBC and OBC-NC (Non-Creamy Layer) are treated differently — different fee brackets, different reservation rules. A lot of students who actually qualify as OBC-NC tick the wrong box. Check your certificate carefully.
- Typing CGPA directly into the percentage field: The field asks for percentage. Entering 9.2 (your CGPA) instead of 87.4 (your converted percentage) distorts your academic record. For CBSE, the conversion is CGPA × 9.5. Use your board’s official formula.
- Uploading a PNG instead of a JPEG: The portal may not throw an error when you upload a PNG — it often just accepts it. But it’ll fail document scrutiny later. Check the file extension before uploading. iPhone users are especially prone to this (iPhones save photos as HEIC by default).
- A typo in the date of birth: Entering 03/07/2007 (3rd July) when the actual date is 07/03/2007 (7th March) is the kind of error that gets caught at the exam centre entry check — not before. The invigilator compares the admit card with the ID proof. A mismatch means you don’t enter. Always cross-check DOB directly from the marksheet, not from memory.
- Paying twice after a failed attempt: The payment seems to fail. The student pays again. Both amounts get deducted. This is one of the most stressful situations to resolve near the exam deadline. If a payment appears to fail, wait 48 hours before trying again or reaching out to the helpdesk.
- Registering with a school email: School email IDs are usually deactivated after Class 12 boards — sometimes even before results come out. IIM Indore sends the admit card and result to the registered email. If that email no longer works, you won’t know. Use your personal Gmail from the start.
What Happens After You Submit?
Submitting the form doesn’t mean you’re done — there are several more steps between now and sitting the exam. Here’s what the timeline looks like:
| Stage | Timeline | What to Do |
|---|---|---|
| Application Confirmation | Right after submission | Download and save the confirmation PDF — keep it in multiple places |
| Application Scrutiny by IIM Indore | 2–4 weeks after the deadline | Nothing to do — just focus on prep |
| Admit Card Release | First week of May 2026 | Log in to the portal and download — don’t wait for an email reminder |
| IPMAT 2026 Exam | 4 May 2026 | Appear at your allotted test centre with admit card and original ID |
| Result Declaration | Around 3–4 weeks after the exam | Check the portal |
| PI Shortlist (if applicable) | After result | Start preparing for the Personal Interview round |
Wondering what score you’ll need to make the shortlist? Read: IPMAT Indore Cutoff 2025
Frequently Asked Questions — IPMAT Indore Application Form 2026
Can I edit my IPMAT Indore 2026 application form after submission?
No, and that’s non-negotiable. The moment you click “Final Submit,” every field is locked — name, date of birth, category, documents, everything. The only way to fix an error is to contact the IIM Indore helpdesk directly, and there’s no guarantee they’ll accommodate a correction. This is why the preview step matters so much.
What is the last date to fill the IPMAT Indore 2026 form?
IIM Indore usually keeps the window open for 4–6 weeks from the notification date. That sounds like a lot, but server problems near the last day are very common. Fill it at least a week before the deadline if you can.
Is there a correction window for the IPMAT 2026 application?
No formal correction window like JEE Main. If you spot an error after submitting, reach out to the IIM Indore admissions helpdesk immediately — but corrections depend entirely on their discretion. There’s no SLA or guarantee. The safest approach is not needing a correction in the first place.
Can a Class 12 appearing student apply for IPMAT Indore 2026?
Yes, absolutely. Students who are still waiting for their Class 12 results can apply — just select “Appearing” in the form and enter your expected details. If you get selected for IPM, you’ll need to clear the minimum percentage bar when your actual results come out. Missing that cutoff means forfeiting the seat.
What if money gets deducted twice from my account?
First — don’t panic. This happens more often than you’d think, especially near the deadline when the server is under load. Contact the IIM Indore admissions helpdesk with your application number and both bank transaction references. Refunds for duplicate payments typically process within 7–10 business days.
Is the application fee refundable if I decide not to appear?
No. The fee is non-refundable under any circumstance — even if you withdraw voluntarily, get disqualified, or simply don’t show up on exam day. Once paid, it’s gone. Make sure you’re committed before paying.
How many test city preferences can I enter?
Three preferences, ranked in order. IIM Indore allots cities based on availability, and the allotment is final — it can’t be changed later. First preference is usually, but not always, honoured.
Can I apply for both IPMAT Indore and JIPMAT in the same year?
Yes, and many serious aspirants do. IPMAT Indore and JIPMAT are completely separate exams with separate forms, separate fees, and separate results. Applying to one has no bearing on the other. It’s a smart hedge if both IIM Indore and IIM Jammu/Bodhgaya are on your list. Read: IPMAT vs JIPMAT — Which Should Aspirants Target in 2026?
What ID proof do I need at the IPMAT 2026 exam centre?
Carry the admit card along with one original government-issued ID — Aadhaar card, passport, voter ID, or PAN card. Photocopies don’t work. If there’s a mismatch between the admit card name and the ID, the invigilator can refuse entry.
What if I uploaded the wrong photo and already submitted?
Contact the IIM Indore admissions helpdesk with your application number right away. There’s no self-service fix — any change, if allowed at all, goes through their team. Some years they allow corrections, some they don’t. The earlier you flag it, the better your chances of getting it resolved.
Conclusion
The IPMAT Indore application form isn’t hard to fill. But it punishes carelessness in a way the actual exam doesn’t — because at least with the exam, you can try again next year without losing your prep work. A form error can cost the same fee, the same year, and the same seat.
Take your Class 10 marksheet out before you open the form. Prepare the photo and signature files before you start. Read every field twice before submitting. And the moment you’re done, download that confirmation PDF and save the application number.
After that — put all of this behind you and focus on what actually gets you into IIM Indore: the score.
Form filled. Now let’s get the score right.
IPM Careers’ IPMAT 2026 preparation programme is open — 500+ IIM selections in the last 3 years.
Join Best IPMAT Coaching in India Now
Have a look at our best courses for your IPMAT Preparation.
Checkout our variety of courses for your IPMAT Preps.
Useful Links :